Beginner Basket Weaving: Make a Small Round Basket
Learn to weave a sturdy little basket by preparing reed, building an even base, shaping the walls, and finishing a clean rim.
The first basket I made was not perfectly round, but it held a pair of scissors and that felt like a triumph. Reed is forgiving when it is handled with patience, and the quiet repetition gives your hands something useful to remember. This beginner basket weaving lesson uses a small, open basket so you can see every crossing. Make the project over a towel, take breaks when your fingers tire, and allow the material to teach you its limits.
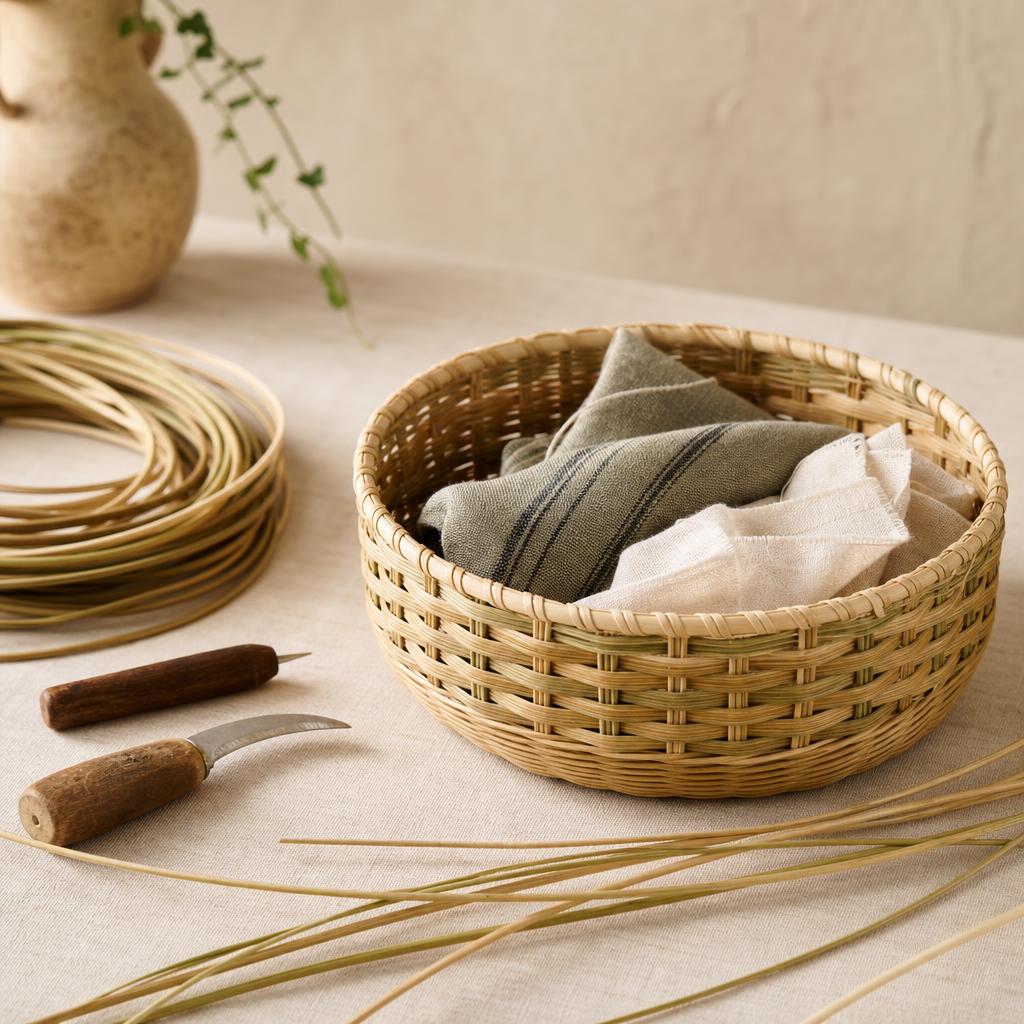
Choose flat paper reed or fine rattan sold for basketry rather than garden twine or random dried grass. Natural materials vary, so read the supplier's instructions before soaking. Keep a bandage nearby for small snags, and cut away splinters rather than pulling them through your skin. Sharp cutters should point away from you, and wet reed should not be left on an unprotected wooden surface. When you understand which pieces are structural, this easy basket weaving project becomes calm instead of fiddly.
## 1. Plan the materials and soften the reed
For beginner basket weaving, an easy basket weaving project starts with sensible basket weaving supplies rather than a crowded toolbox. To soak weaving reed, test one strip in the basin before committing the whole bundle. Count the basket weaving spokes twice, because one missing spoke changes the rhythm of the base. Keep the unused materials dry while you work so each piece has a predictable flexibility.
Measure a handful of spokes to the same length; for a first basket, eight or twelve spokes make a manageable base. Cut thinner weavers long enough to circle the base with extra length for joining. The essential basket weaving supplies are modest: reed, water, a towel, scissors, a ruler, a pencil, and something blunt for opening a gap. A few clothespins are helpful but not essential. Lay everything in order so a wet hand does not have to search for a tool.
Mark the center of each spoke with a small pencil line. To soak weaving reed, place only the pieces you are about to use in room-temperature water and follow the material label for timing. Very long soaking makes some reed fuzzy, while too little leaves it brittle. After soaking, blot the strips until they are flexible but not dripping. Keep unused pieces dry, and return a working strip to the water briefly if its edges begin to crack.
The first checkpoint is a set of spokes with matching centers and no split ends. To soak weaving reed well, test one strip by bending it around your finger; it should curve rather than snap, but it should not feel slimy. Sort wide spokes from narrow weavers. Wide pieces provide the skeleton, and the flexible pieces fill the spaces. If a strip has a weak section, cut it shorter and reserve it for a small join rather than hiding it in the wall.
## 2. Make a stable round base
To learn how to weave a basket, first inspect the round basket base from above, then reposition one of the basket weaving spokes if the star is lopsided. As you weave over and under, feel for moderate basket weaving tension: the center should hold together without puckering. This early pause makes it easier to shape basket walls later without forcing the fibers.
Lay four spokes across four others at their pencil marks, making a centered cross. Slide the second pair through the first pair so the arrangement resembles a small woven star. Hold the center firmly with your thumb and begin with a thin weaver. To learn how to weave a basket, start with control rather than speed: pass the weaver over one spoke, under the next, and repeat around the center. Keep the tail long enough to tuck later.
As the first row closes, spread the spokes at equal angles. A round basket base depends on that spacing, so rotate the work after every few crossings. The phrase weave over and under sounds simple, but each pass should lie snugly beside the previous one without stacking or leaving a window. Use a blunt awl to open a path if the center becomes crowded; never force a sharp tool through your palm. Add a second row with the same rhythm, hiding the tail beneath crossings.
Check the round basket base on the table. If it rocks, one spoke may be crossing at an angle or the rows may be tighter on one side. Correct the problem while the reed is damp: loosen one crossing, reposition the spoke, and compress the row again. The second checkpoint is a flat center, spokes that radiate like clock hands, and no loose loop. A slightly irregular edge can be corrected as the wall rises, but a twisted center will continue to announce itself.
The right basket weaving tension is firm enough to hold the pattern but gentle enough that spokes can still move. Test it by lifting the base with two fingers. If the rows spring apart, tighten the next pass and tuck the tail. If the spokes bow dramatically, ease the last row instead of pulling harder. I prefer several moderate rows to one brutally tight row; the fibers stay smooth, and the base remains comfortable to shape.
## 3. Turn the spokes and form the walls
Before the wall gets tall, repeat how to weave a basket in your head: each pass should weave over and under, then settle beside its neighbor. Use the developing curve to shape basket walls, and add new weaving reed at a join only after the old tail is tucked. Add new weaving reed with a tapered overlap, never with two blunt ends stacked together.
When the base reaches your planned diameter, dampen the spokes and bend each one upward a little at a time. Do not make a sharp fold at the exact edge. Support the base with one hand while your other hand guides the spokes, walking around the circle until the wall has a gentle curve. If you have a small mold, place it inside and use it as a quiet reference rather than clamping the reed against it.
Now weave the wall with the same over-and-under sequence, staggering joins so two tails never sit side by side. To shape basket walls, angle each new row slightly toward the profile you want. A straight wall suits a pencil cup; a slight flare makes it easier to reach inside. Check from above and from the side after each row. The open ends of spokes should rise together, and the rim should not drift into an oval unless that is intentional.
Good basket weaving tension is especially important here. Pull the weaver until it touches the previous row, then stop. If you yank, the wall narrows; if you leave slack, gaps appear. Press the rows downward with a thumb or blunt tool and rotate the basket rather than twisting your wrist. If a spoke breaks, pause, soften its end, and splice it behind a crossing. Do not keep weaving over a sharp splinter.
When a weaver is nearly finished, add new weaving reed by overlapping its tapered end with the old strip for two or three crossings. Hide the join on the inside or in a spot that will be covered by the next row. The third checkpoint is a wall that feels firm when gently squeezed, with an even top height and no large holes. If the basket leans, loosen the last few passes and guide the high side inward before continuing.
## 4. Secure the rim and make it useful
For beginner basket weaving, an easy basket weaving project is most satisfying when the finish is practical. Gather the basket weaving supplies again, especially the cutters, and count the basket weaving spokes before folding the rim. To finish basket rim work, trim basket ends only after every tuck is secure. A handmade storage basket can follow a beginner weaving pattern with one final join, then a second look at the handmade storage basket catches snags before use. Let the beginner weaving pattern remain visible; it records the rhythm you learned.
Let the last row settle, then decide on a folded, braided, or tucked rim. For a simple folded rim, bend each spoke over the next two spokes, guide the tip down beside a neighboring upright, and use a blunt awl to open space. Work in the same direction around the basket. A clothespin can hold the first few folds while your hands establish the rhythm. Keep the curve gradual so the rim does not develop a harsh corner.
To finish basket rim work neatly, tuck every end behind at least two crossings before trimming. Pull the final weaver snug, tuck it inside, and press it flat. Finish basket rim details by running a finger around the edge with a towel between your skin and the reed; this catches a rough barb without scraping your hand. If the edge feels sharp, sand only a tiny dry tip with fine paper and wipe away dust. Never cut a spoke until you are sure the neighboring crossings hold it.
Now trim basket ends with sharp cutters, aiming the blades away from your fingers. Leave enough tail under the crossing to prevent the end from springing free. Trim basket ends one at a time and check the inside after each cut. A blunt tool can push a stubborn tip deeper, but do not pound it, because impact can flatten or split the wall. Let the finished basket dry in its natural shape on a towel, away from direct heat.
As it dries, inspect the basket twice rather than repeatedly bending it. If an edge lifts, dampen that tiny area, tuck it again, and hold it with a clothespin until it settles. For a handmade storage basket, add a fabric liner only after the reed is completely dry. A liner can hide loose crumbs while also protecting small items. Do not use an unsealed natural basket for standing water, heavy wet laundry, or anything that could encourage mildew.
Your final checkpoint is a rim that does not snag, a base that rests evenly, and walls that hold their shape when the basket is lifted. A beginner weaving pattern should leave room for learning: one uneven spoke is preferable to a crushed structure. I like to write the date on a small paper tag and keep the first basket where I can use it. Every time I reach for thread or clips, I can see how the repeated crossings became a steady, handmade object.
Materials You'll Need
- Flat basket reed or rattan
- Basin of room-temperature water
- Sharp scissors or reed cutters
- Cloth towel
- Ruler and pencil
- Clothespins
- Blunt awl or basket tool
- Small round mold (optional)
Step-by-Step
Prepare the Reed and Base
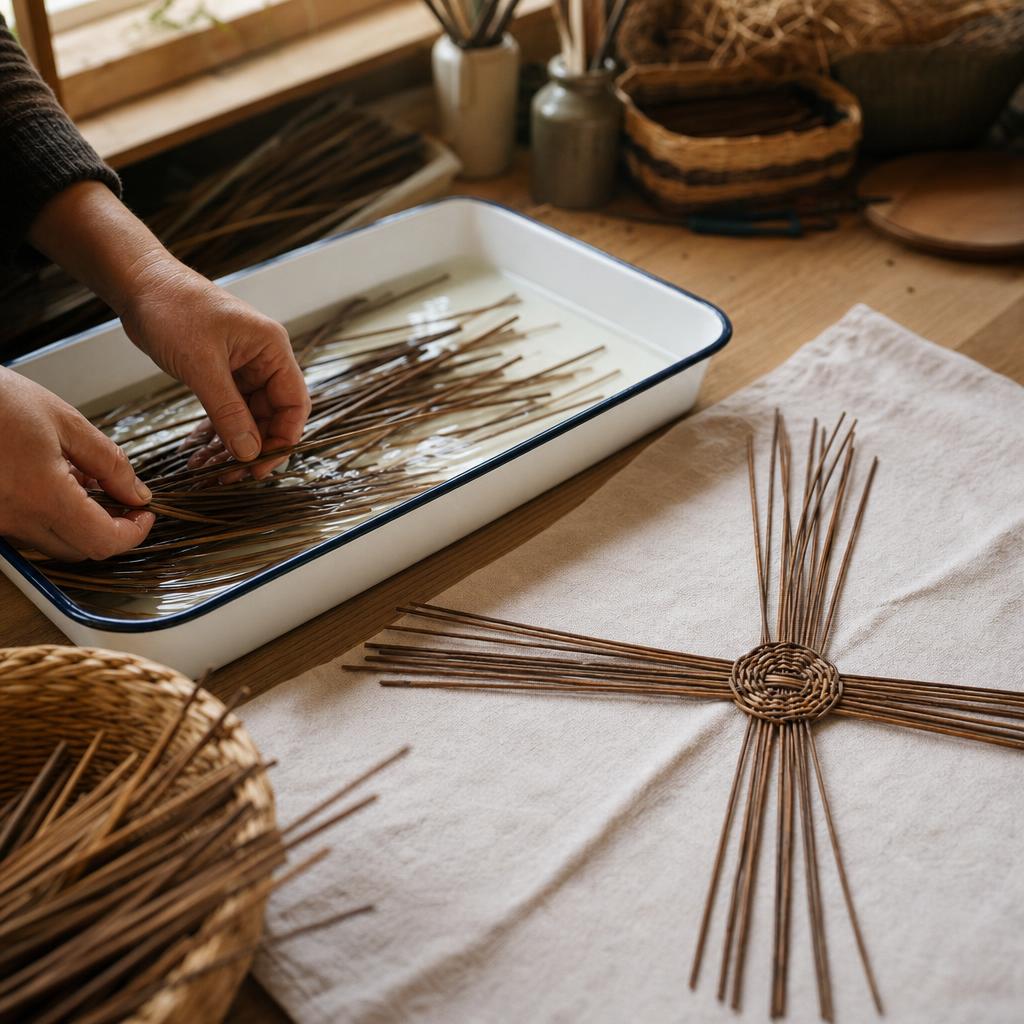
Cover the table with a towel, gather flat basket reed or fine rattan, and read the supplier's soaking directions before cutting. For a small round basket, measure eight or twelve structural spokes to the same length and cut flexible weavers long enough to circle the planned base with extra length for joins. Mark the center of every spoke with a small pencil line; count them twice because one missing spoke changes the rhythm. Keep unused reed dry while you work so its flexibility remains predictable. Test one strip in room-temperature water before soaking the bundle. Submerge only the pieces you are about to use, then blot them on the towel until they bend without dripping. The checkpoint is a sorted set of wide spokes and narrower weavers with matching centers, clean ends, and no splits. Bend a test strip around a finger: it should curve rather than snap, but it should not feel slimy. If a piece cracks, return it briefly to the water and retest; if it has a weak split, cut it shorter and reserve it for a small join instead of hiding it in the wall. Keep a bandage available for snags, and never pull a splinter through skin. Place scissors, ruler, pencil, towel, clothespins, and a blunt awl within reach, with sharp cutters pointing away from you.
Build the Round Base
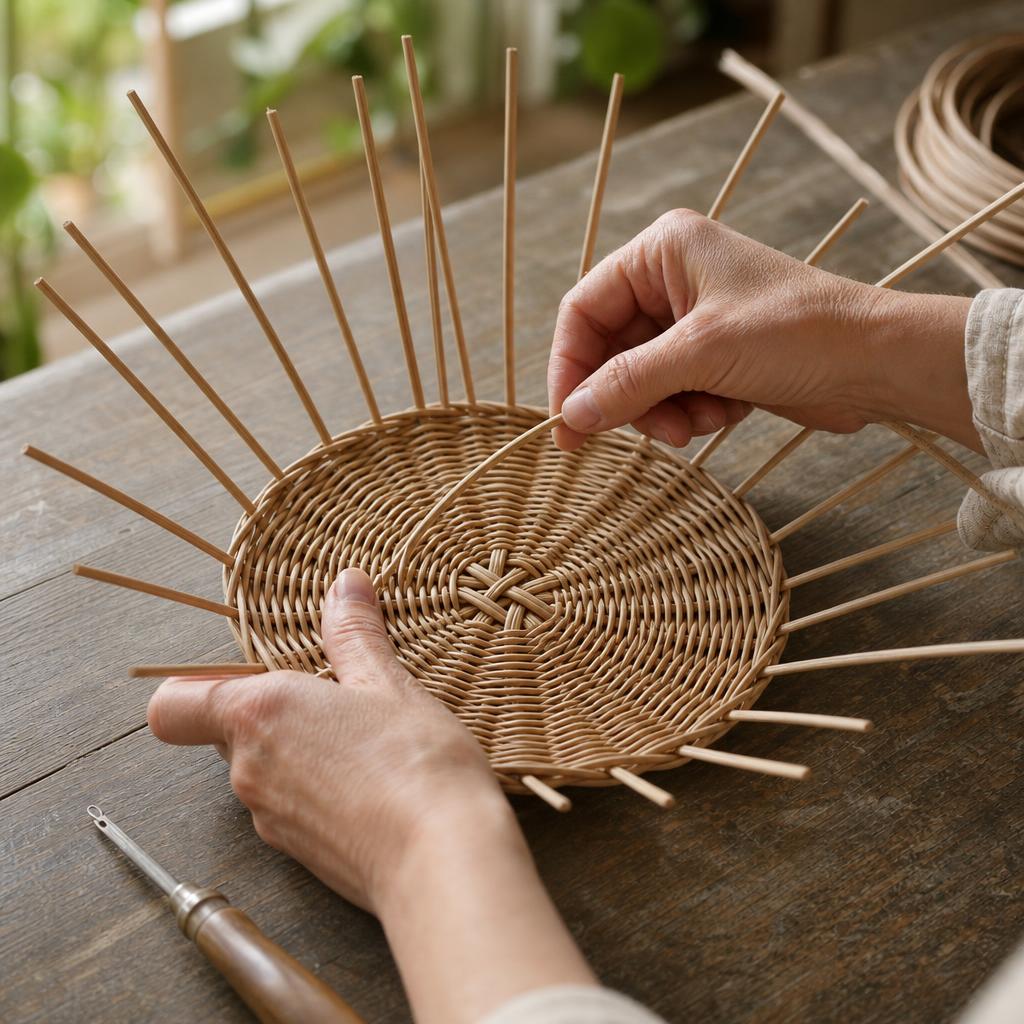
Lay half of the spokes across the other half at their pencil marks, then slide the second group through the first so the crossing forms a centered star. Hold the intersection firmly with your thumb and begin with a thin weaver, leaving a tail long enough to tuck beneath later crossings. Pass the weaver over one spoke, under the next, and repeat around the center. Keep every pass beside the previous one without stacking or leaving a window. After several crossings, spread the spokes at equal angles and rotate the work so you are not tightening only one side. The checkpoint after the first rows is a flat center with spokes radiating like clock hands, not a twisted bundle. Lift the base with two fingers to test the basket-weaving tension: it should hold together, while the spokes can still move slightly. If the star is lopsided, loosen the nearest crossing while the reed is damp, reposition the spoke, and compress the row again. If the center puckers, ease the last pass rather than pulling harder; if a gap opens, snug the next pass beside it. Use a blunt awl to open a path when the center is crowded, keeping the point directed away from your palm. Tuck the starting tail beneath two crossings, add a second or third row with the same over-and-under rhythm, and recheck the base on a flat table before raising the sides.
Raise and Shape the Walls
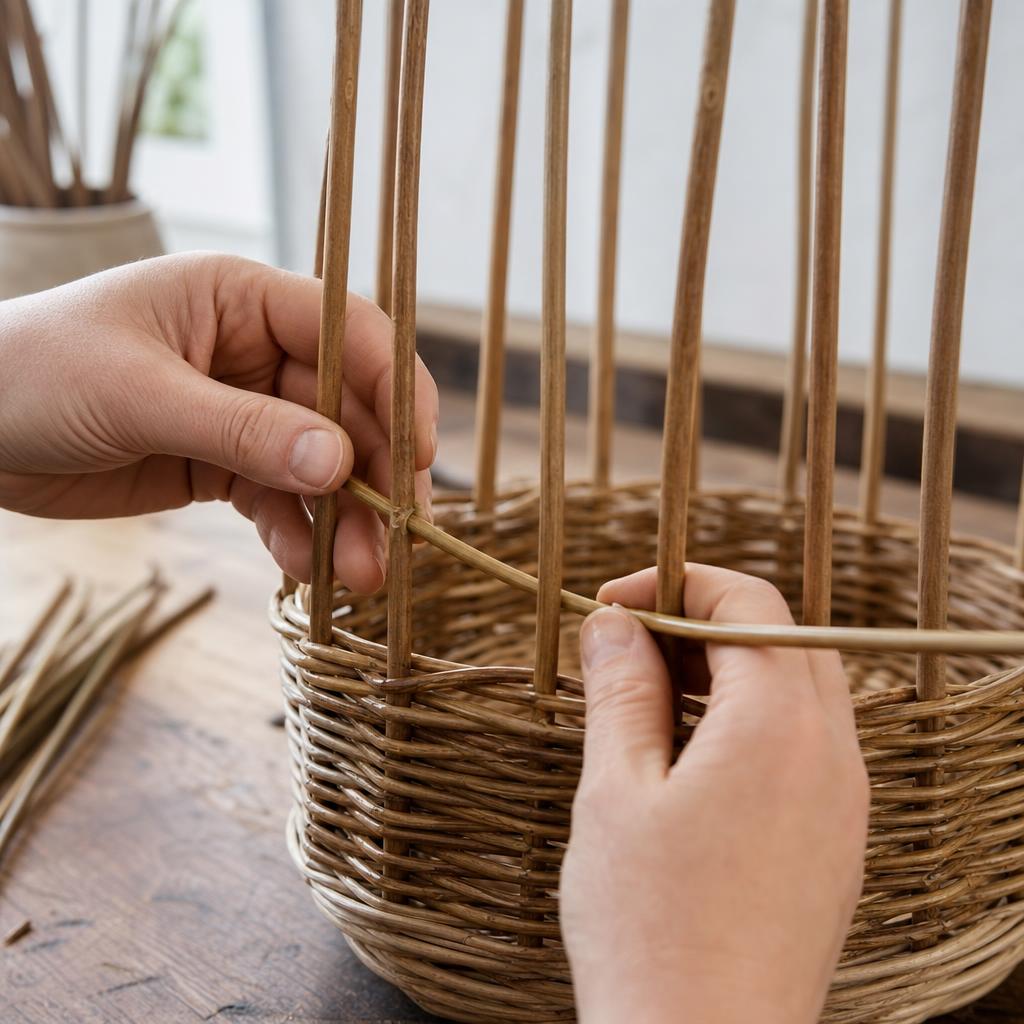
When the base reaches the intended diameter, dampen the spokes and turn them upward gradually rather than folding them sharply at the edge. Support the woven base in one hand and guide each spoke with the other, walking around the circle until the wall has a gentle, continuous curve. If using a small round mold, place it inside as a reference without clamping wet reed tightly against it. Begin each wall row with the same over-and-under sequence, and press it down beside the preceding row with a thumb or blunt tool. Pull a weaver until it touches the row, then stop; excessive force narrows the basket, while slack leaves holes. Angle successive rows slightly inward for a pencil cup or slightly outward for easier access, checking diameter from above and profile from the side after each row. The checkpoint is a firm wall with even top height, consistent gaps, and spokes rising together rather than drifting into an oval. If the basket leans, loosen the last few passes and guide the high side inward before continuing. If a spoke breaks, soften its end and splice it behind a crossing; remove any sharp splinter rather than weaving over it. When a weaver runs short, taper its end and overlap it with the new strip for two or three crossings, staggering joins so blunt ends never stack side by side. Hide each join on the inside or beneath the following row, and keep rotating the basket to protect your wrists.
Secure the Rim and Finish
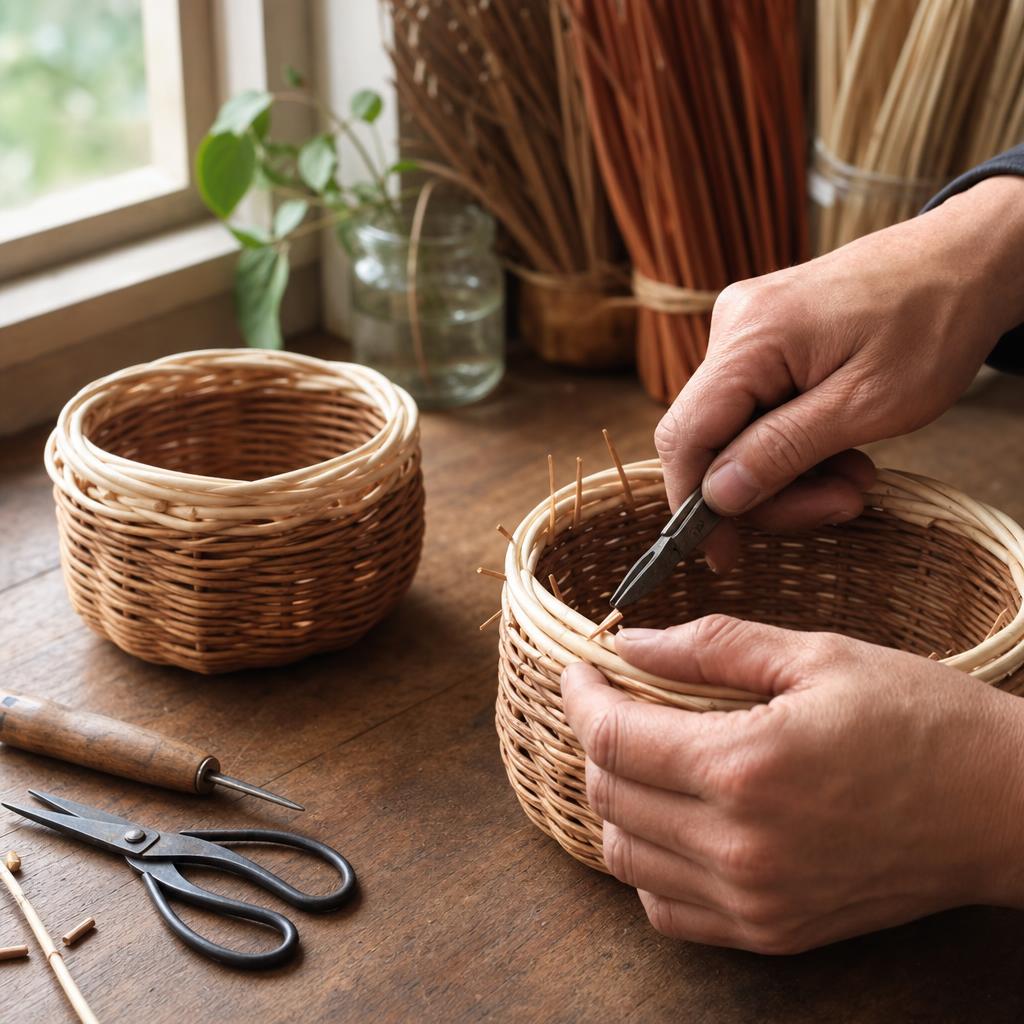
Let the final wall row settle, then choose a folded rim for a first basket. Work in one direction: bend each upright over the next two spokes, guide its tip down beside a neighboring upright, and use a blunt awl to open space rather than forcing the reed. Hold the first folds with clothespins while the rhythm becomes established, keeping the curve gradual so the rim does not kink. The checkpoint is a continuous edge that holds its shape when gently lifted, with every spoke tucked behind at least two crossings. Tuck the final weaver inside and press it flat before trimming basket ends. Use sharp cutters pointed away from your fingers, cut one tail at a time, and leave enough length under each crossing to prevent spring-back. Run a towel-wrapped finger around the rim to find snags; push a stubborn tip deeper with a blunt tool, but never pound it, since impact can split the wall. Sand only a tiny, fully dry rough tip with fine paper, then wipe away dust. Set the basket on a towel in its natural shape, away from direct heat, and let it dry without repeatedly bending it. If an edge lifts during drying, dampen only that spot, retuck it, and hold it with a clothespin until settled. The finished basket should have an even base, secure rim, stable walls, and no sharp ends. Add a fabric liner only when fully dry, and keep natural reed away from standing water or mildew-prone wet loads.
Written by

Hannah Williams
Upcycling & Sustainable Craft Advocate
Hannah makes beautiful things from things other people throw away. Her upcycling projects champion sustainability without ever sacrificing style.