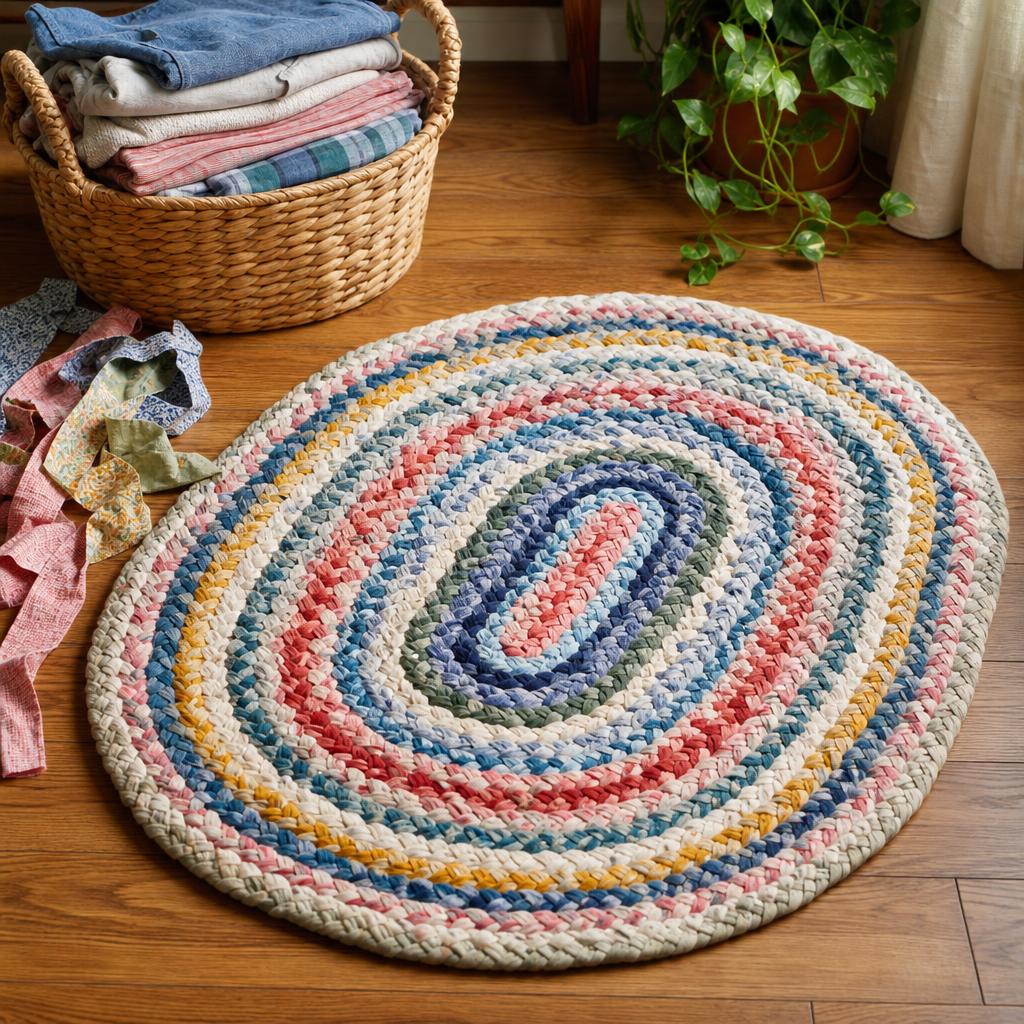
How to Make a Rag Rug from Clothes You Already Own
Give worn cotton clothing a second life by turning it into a soft, colorful rag rug with a sturdy hand-finished edge.
I love an object that remembers where it came from. A faded shirt can carry a holiday, a sheet can recall a first apartment, and together those fabrics become something useful rather than another bag of scraps. This guide to how to make a rag rug begins with a patient sort through the laundry basket, not a trip to a craft shop. Cotton jersey, denim, flannel, and tightly woven cotton all work, although very stretchy knits need a gentle hand. Avoid fabric with mildew, brittle elastic, metal decorations, or stains that will not survive another wash. This upcycled fabric project is especially satisfying when one small cloth has a story attached to it. The same calm approach makes a DIY rag rug feel personal rather than mass-produced.
Before cutting, wash and dry everything as you intend to clean the finished rug. The most reliable rag rug materials are clean, colorfast textiles, strong scissors, a blunt needle, durable thread, clips, and a nonslip layer. I also keep a tape measure, chalk, and a basket for tiny scraps nearby. If you are planning an old clothes rug, check pockets carefully and remove zippers, buttons, and thick hems. Those details can make a comfortable floor covering lumpy, and hidden coins are an unwelcome surprise. Saving a label or pocket can still give an old clothes rug a thoughtful signature after the practical trimming is done. Add a second glance to your rag rug materials before you begin; replacing a dull blade is safer than forcing it through thick cloth.
### Step 1: Prepare and plan the cloth
The first job in any DIY rag rug is deciding on a shape and palette. A small oval beside a bed is forgiving, while a large rectangle needs more even tension and more patience. Lay garments on the floor and group lights, darks, and accent colors. I photograph the arrangement before cutting because piles tend to shuffle. Mark a simple color rhythm with sticky notes rather than committing to a complicated pattern.
To prepare fabric strips, cut away seams and collars first. For a woven sheet, make a small snip about 2.5 centimeters from an edge, then tear across the grain; tearing is quick and gives a pleasantly soft edge. For jersey, cut a continuous spiral around the body of a shirt, stopping before the armholes, and stretch the resulting ribbon lightly so it curls inward. A strip between 3 and 5 centimeters wide is a practical starting point. Wider strips make a thick rug; narrower strips make a flexible one but require more length. Even when you prepare fabric strips from the same garment, check them individually because worn areas can stretch at different rates.
Pause for a checkpoint after every few garments. Hold the strips beside one another and ask whether their widths and stretch feel compatible. If one ribbon springs back dramatically, set it aside for a smaller accent. If colors bleed during a damp test, wash them separately or use them only where a little blending is welcome. Never rush to cut a favorite garment: a paper template lets you test the desired spiral first, and saving a pocket or label can make the finished rug more personal.
### Step 2: Create dependable lengths
When a strip ends, join fabric strips with a low-profile connection. For sturdy woven cloth, overlap the ends by about 4 centimeters and sew a compact box or diagonal seam; trim the corners afterward. Jersey can be joined with a small slit in each end: pass one end through the other, then pull the loop snug. That quick join is useful, but I still stitch a few high-stress connections when the rug will be used in a busy hallway. Keep the seam flat so a later coil does not develop a hard lump. Before stitching the growing edge, join fabric strips in your hand and tug once to test the connection.
The key technique in a braided rag rug tutorial is consistent, relaxed tension. Clip three long strips to a cushion, heavy book, or temporary hook, then braid as though you were braiding hair. Cross the outside strip over the middle without yanking. Every dozen crossings, lay the braid on the floor and inspect its width. If the braid narrows, loosen the last section; if it flares, ease the fabric rather than pulling it tight. This checkpoint prevents a beautiful beginning from becoming a rope that twists. A second braided rag rug tutorial can wait until the first braid lies flat; repeating the motion too quickly usually magnifies a small tension problem. Once the rhythm feels steady, explain to yourself how to make a rag rug in one sentence: cut evenly, tension gently, and check often.
Troubleshoot as you go. A strip that frays can be folded once at the end and stitched, while a strip that keeps rolling is usually best left rolled rather than forced flat. If the join feels bulky, unpick it and use a longer diagonal seam. Keep the growing braid in a loose basket so it does not drag across the floor or collect dust. A little irregularity is part of the charm of an upcycled fabric project, but loose tails deserve attention before they are hidden inside the rug.
### Step 3: Shape the braid
To braid a rag rug into a round, begin with a short, tightly stitched center or a small flat coil. For an oval, start with a two- or three-inch straight section and turn at its end. Lay the braid down as you work instead of lifting it into your lap. This simple habit shows whether the sides are staying parallel. If you want a more textured finish, coil a rag rug with the braid on its narrow edge in the center and gradually tip it flatter; for a first rug, keeping the braid flat is easier to control. If you choose to coil a rag rug, pause at every turn and make sure the underside remains smooth. It is easier to braid a rag rug accurately when the work surface is large enough to see the whole curve.
Use clips every 10 to 15 centimeters and check the silhouette after each full turn. A curve that cups upward usually means the braid is too tight on the inside; loosen the working strip or undo a few stitches. A wavy edge usually means the outer path has too much fabric; gently compress that section before securing it. Rotate the rug frequently so your hands do not favor one direction. Work on a clean table or floor, and take breaks, since repetitive pulling can strain fingers and shoulders.
If you are following beginner rug making, stop when the piece is smaller than the intended final size and let it rest overnight. The fibers often relax, revealing a curl that was hard to see while working. Compare the resting piece with your sketch, then add length in small increments. Do not stretch the rug to make it appear larger. Stretching hides uneven tension temporarily and returns as a puckered edge after washing. With beginner rug making, an honest pause is a technique, not a sign that the project has gone wrong.
### Step 4: Stitch and finish for the floor
For a secure finish, sew a rag rug from the center outward with upholstery thread and a blunt needle. Ladder stitch between adjacent braid rows, catching the lower half of one braid and the upper half of the next. Make small, regular stitches, and pull only until the rows touch. Very tight stitches can pucker the cloth. Turn the rug often and check the underside; if the thread is making a straight ridge, spread the stitches over a wider section. Anyone learning how to make a rag rug should make this first finishing pass slowly, because hidden loose stitches are harder to repair later. To sew a rag rug neatly, let the needle follow the braid's natural path instead of crossing the visible surface.
Add rag rug backing when the floor is smooth, the rug is large, or someone in the household needs extra stability. Trim a thin nonslip mesh to sit just inside the finished edge, then tack it at several points rather than sewing a stiff border around it. For a tiny mat, the backing may be unnecessary, but test it by walking across the rug in clean socks. If a corner lifts, secure another section and recheck. Never use loose adhesive or a curling mesh where it could become a trip hazard. A carefully fitted rag rug backing should remain invisible from above and should never make the edge curl. Turn the finished mat over once more to inspect the rag rug backing before anyone walks on it.
Before calling it a washable rag rug, examine every join and knot. Snip only loose threads, never the structural ones, and press a stubborn edge with a damp cloth and low heat. Wash gently in cool water, use a mild detergent, and dry flat when the fiber blend allows it. A deep rug may need professional cleaning instead of a crowded household machine. The final checkpoint is practical: place it flat, walk over it, and make sure it does not slide, shed, or rock. Treat a washable rag rug as a textile first: test a hidden color, avoid harsh bleach, and let it dry completely before returning it to the floor. Once a washable rag rug is fully dry, brush it lightly and store cleaning notes with it.
The best upcycled fabric project is one that earns its place in daily life. I keep my first rug by the back door because its mismatched colors hide muddy-season marks and its uneven rows remind me to slow down. A fabric strip rug can be just as practical in a reading corner, where its softness matters more than a perfectly measured border. That small DIY rag rug is also a useful place to practice repairs before attempting a larger floor piece. A second fabric strip rug could use a calmer palette, while an old clothes rug can celebrate every bright leftover. With thoughtful sorting, calm tension, and regular checks, beginner rug making becomes less about perfect geometry and more about giving useful cloth another long chapter. The next braided rag rug tutorial I try will use linen, but the same rag rug materials should still suit it. I will prepare fabric strips more slowly, join fabric strips with flatter seams, and braid a rag rug around a wider center. If I coil a rag rug in that shape, I will sew a rag rug in shorter sections and inspect the edge between each one. A third fabric strip rug might even use only pale neutrals for a quieter room.
Materials You'll Need
- Clean cotton T-shirts, sheets, or worn shirts
- Sharp fabric scissors
- Tape measure and tailor's chalk
- Clips or safety pins
- Upholstery thread and blunt needle
- Nonslip rug backing
- Iron and pressing cloth
Step-by-Step
Sort, Wash, and Cut the Cloth
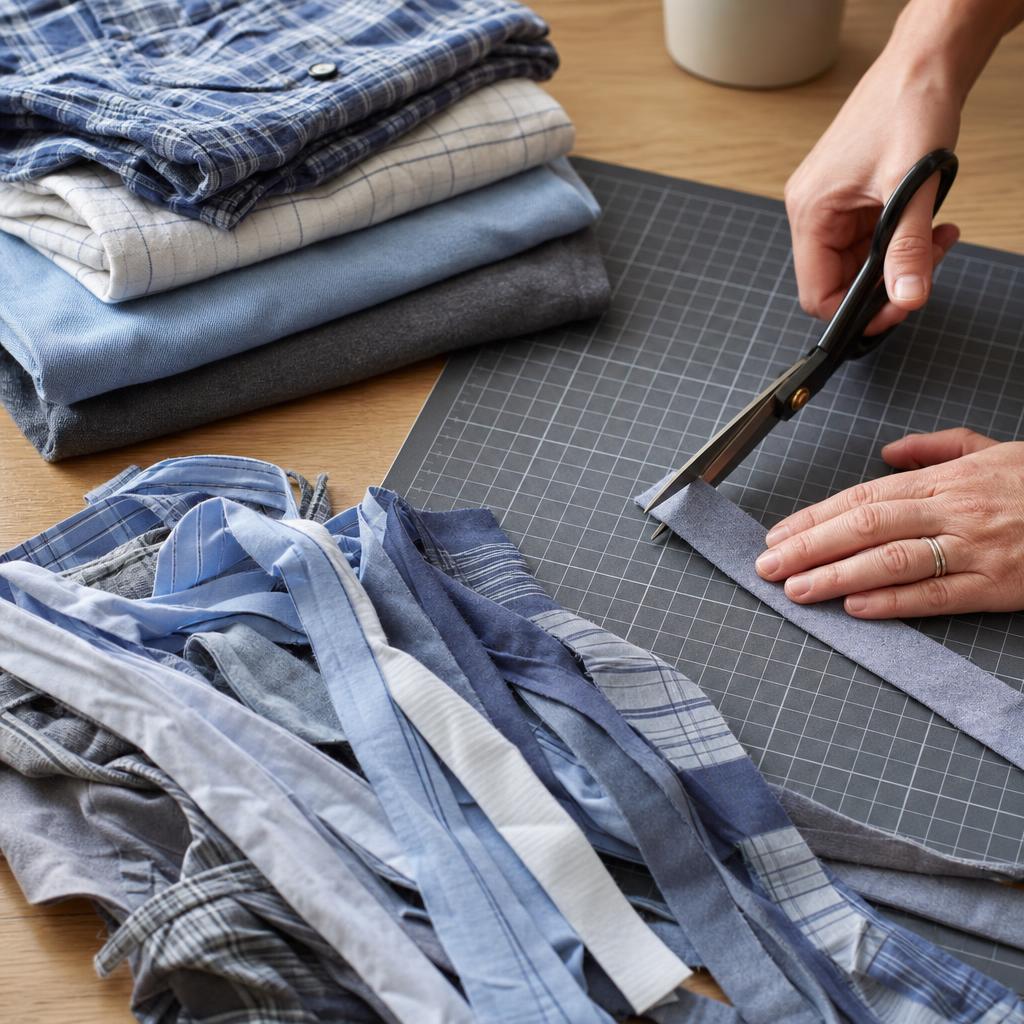
Choose clean cotton T-shirts, sheets, flannel, or lightweight denim, and reject cloth with mildew, brittle elastic, heavy hardware, or weak, sun-damaged areas. Empty pockets, remove buttons, zippers, thick hems, and collars, then wash and dry every garment using the same method planned for the finished rug. Sort the cloth by color and by stretch before cutting; a paper sketch or a quick floor layout helps you balance dark, light, and accent pieces. For woven fabric, snip about 3 centimeters from an edge and tear across the grain, or cut with sharp fabric scissors if the weave will not tear cleanly. Cut strips 3 to 5 centimeters wide, following the grain where possible. For jersey, cut a continuous ribbon and stretch it gently to make the edges curl. After several strips, hold them together: widths and stretch should feel compatible, and no strip should spring back dramatically. If a strip varies because of a worn patch, cut it shorter or reserve it for the center. Stop and redraw a paper template if a favorite shirt is being cut incorrectly. Wear shoes while using scissors, keep blades closed when setting them down, and save labels or pockets for a deliberate decorative detail.
Make Continuous Strips
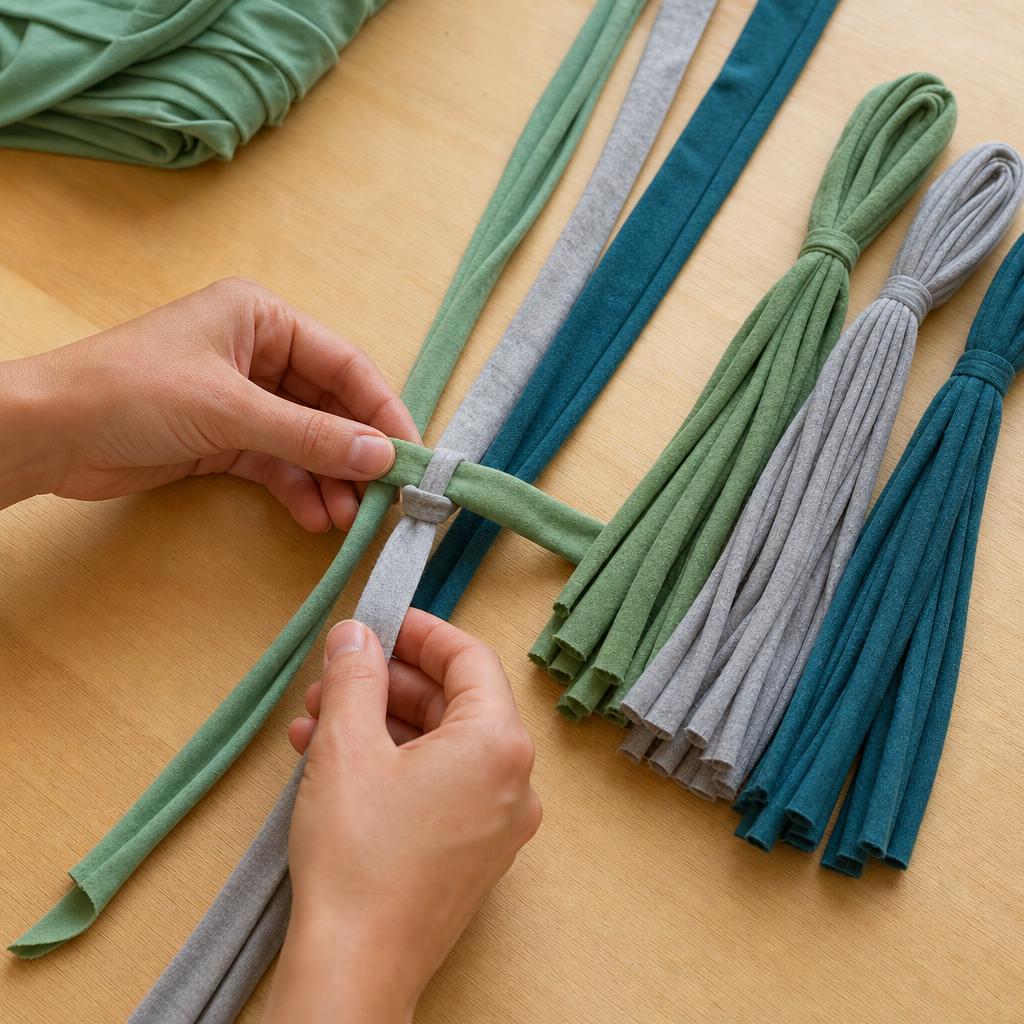
Turn each prepared garment into one manageable ribbon by making a small starter snip near an edge and cutting around the body in a spiral, keeping the width consistent through each turn. On a sheet or woven shirt, use the grain and tear across it where that produces a straight edge; on jersey, cut rather than tear around armholes and other curves. Round sharp corners so the strip does not form a stiff hook, then stretch a short sample. It should curl without snapping or becoming a narrow cord. When one strip ends, join fabric strips with a flat connection: overlap woven ends by about 4 centimeters and sew a compact box or diagonal seam with strong thread, or cut a small slit in each jersey end and pass one end through the other before pulling it snug. Add a few stitches to any join destined for a busy hallway. Tug every connection once before adding it to the braid. A bulky seam will make a lump later, so unpick it and replace it with a longer diagonal seam rather than hiding it. If fabric frays, fold its end once and stitch it. Keep the growing lengths in a clean basket, use clips to prevent tangles, and protect fingers from the scissors and needle.
Build and Shape the Rug
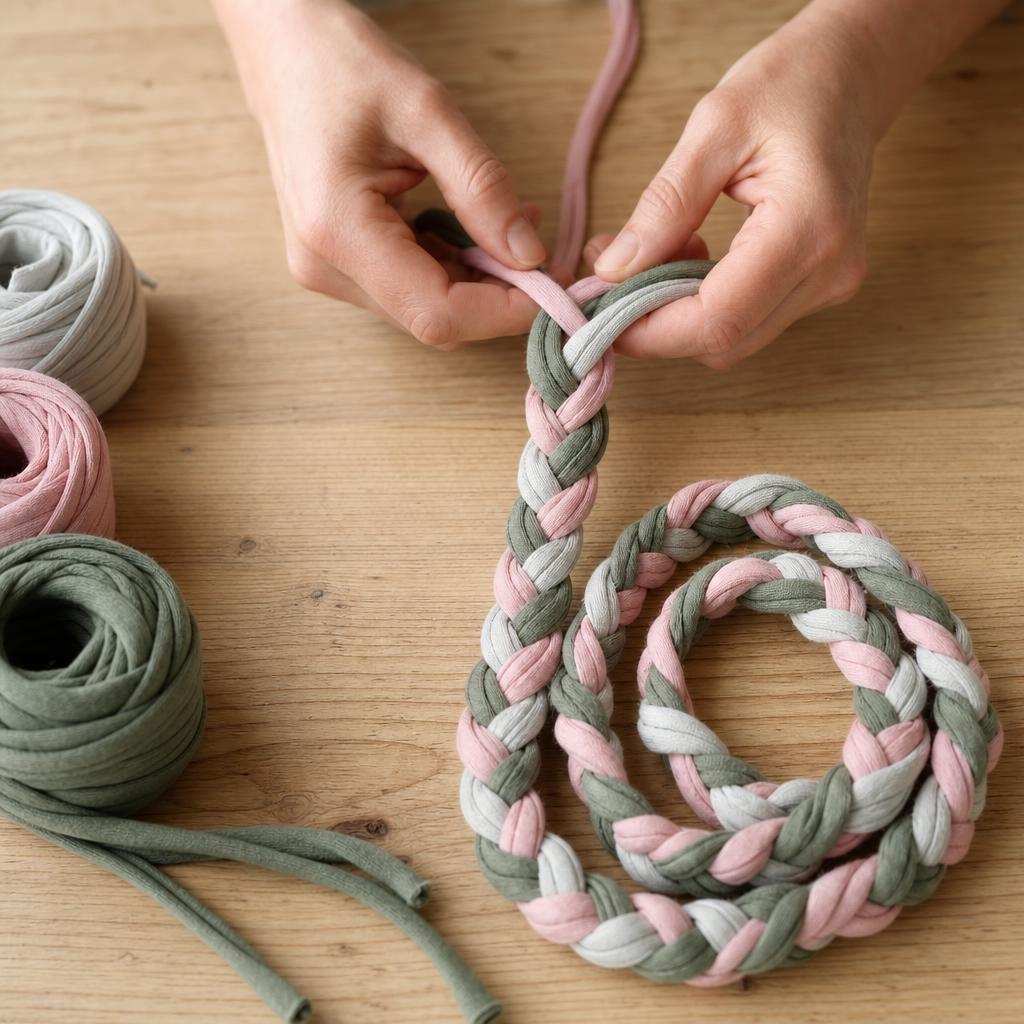
Anchor three prepared strips to a cushion, heavy book, or temporary hook, leaving enough room to braid without pulling the anchor toward you. Cross the outside strip over the middle in a steady rhythm, keeping the braid relaxed rather than compressing it into a rope. Every 10 to 15 centimeters, lay it on a clean, flat surface and compare its width with the earlier section. The braid should lie flat, with no tight waist or loose fan. For a round rug, begin with a small stitched center coil; for an oval, make a short straight section before turning the first curve. Coil the braid flat as you work, clip neighboring rows, and rotate the piece often so one side does not receive tighter handling. An upward cup means the inside curve is too tight: loosen the last section or undo a few crossings. A wavy outside edge means the outer route has too much length; ease the braid inward without stretching it. If the rug buckles, stop adding length, unclip the problem area, and let the fibers relax before correcting it. Check the silhouette from above after each turn, take breaks from repetitive pulling, and never stretch the rug to fake its final size.
Secure, Back, and Finish
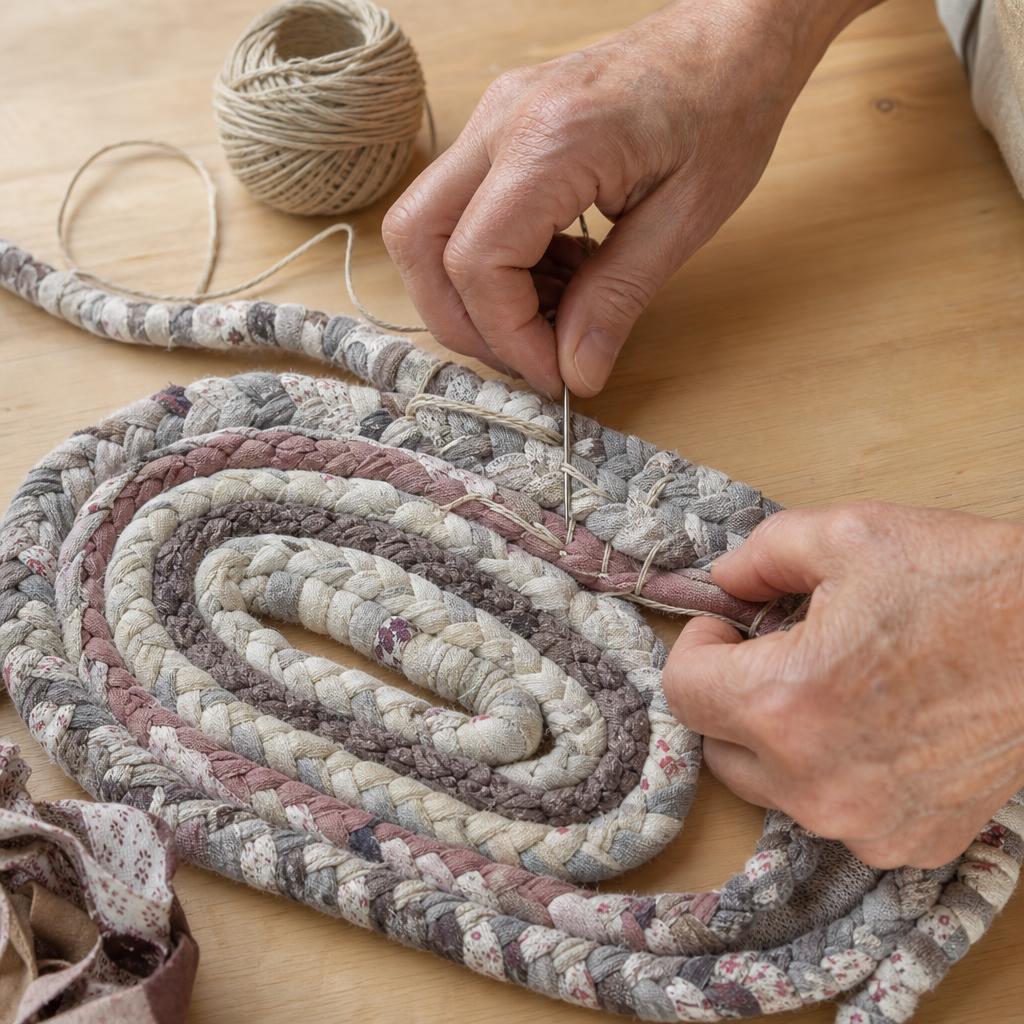
Thread a blunt needle with upholstery thread and secure the rug from the center outward, using a ladder stitch between neighboring braid rows. Catch the lower half of one row and the upper half of the next, spacing small stitches regularly and pulling only until the rows touch. Turn the rug often to inspect the underside. If thread makes a ridge or the cloth puckers, loosen that stitch and spread the tension across a wider section; a skipped structural join should be repaired before proceeding. Finish every strip tail with a secure, hidden stitch rather than cutting a load-bearing thread. For smooth floors or larger rugs, trace the finished shape onto thin nonslip mesh, trim it just inside the edge, and tack it at several points. Test the rug in clean socks: it should lie flat, with no curling corner, rocking section, exposed needle, or loose mesh that could become a trip hazard. Press a stubborn edge through a damp cloth on low heat, testing a hidden area first. Inspect colorfastness, then wash gently in cool water with mild detergent only if the fiber blend permits it; dry flat and completely. A deep rug may need professional cleaning instead of a crowded household machine.
Written by

Clara Jensen
Scandinavian Home Craft & Candle Maker
Clara brings Nordic simplicity and warmth to home crafting. She specializes in soy candles, beeswax wraps, and hygge-inspired home accessories.