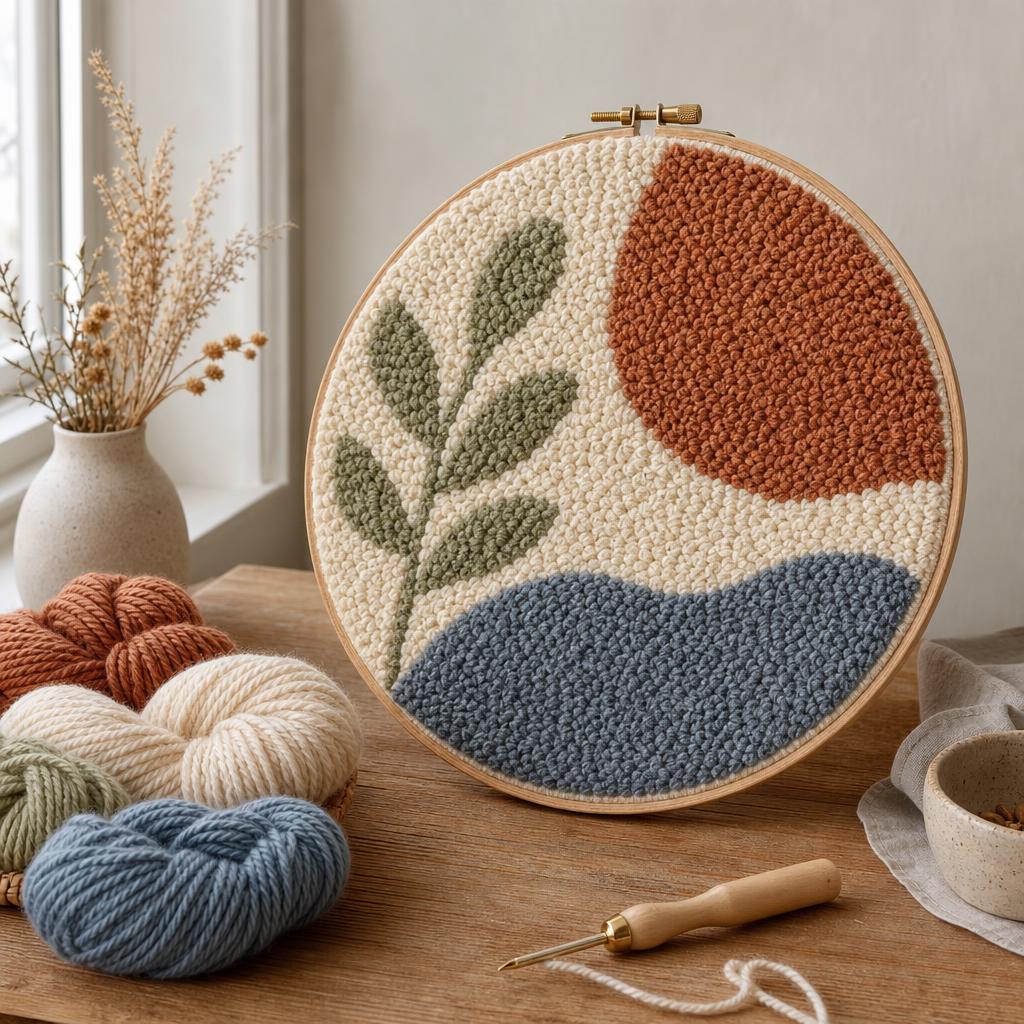
Punch Needle for Beginners: Make a Textured Wall Hanging
Learn a calm, forgiving looped-stitch method and turn a simple drawn motif into modern fiber art for your home.
There is something wonderfully immediate about this craft. A line drawn on cloth can become a raised ridge in a few minutes, and a quiet afternoon of repetition leaves you with a soft picture to touch. My first piece was not perfectly even, but its little variations made the moon look hand drawn. This guide to punch needle for beginners focuses on control, not perfection, so the process stays inviting. The best part of punch needle for beginners is that a small swatch provides a complete lesson.
Step 1: prepare the design and foundation
Start with a simple motif containing broad areas: a sun, arch, leaf, or abstract checkerboard is easier than a portrait. A beginner punch needle project benefits from fewer tiny points because loops need room to turn. For a second beginner punch needle project, repeat that motif at a slightly larger scale; a third beginner punch needle project can introduce one curved edge. Trace the design on the reverse side of the cloth if you want the raised side to mirror your drawing. Use a washable marker with a fine line, and mark a small arrow showing the direction of each color area.
Gather punch needle supplies before stretching anything. You need the tool, suitable cloth, yarn, a frame, scissors, and a backing material. Keep spare punch needle supplies in a shallow tray so a missing threader does not interrupt the rhythm. A written punch needle supplies checklist is useful when packing for a class. Foundation cloth must have a firm, even weave that closes around the punctures; loosely woven household fabric will let loops pull out. I test a corner with three passes before committing. The correct punch needle fabric feels taut but not brittle when held to the light. If the punch needle fabric frays during the test, choose a tighter foundation rather than compensating with extra glue. A fresh punch needle fabric sample is worth testing before an ambitious design.
Place the cloth over the smaller ring of a punch needle hoop and tighten the outer ring. Pull opposite edges gradually, like lacing a shoe, instead of yanking one side. The surface should sound faintly drumlike when tapped. A second punch needle hoop is useful when several colors need separate setups, and a third punch needle hoop can hold a practice swatch. If the frame has gripper strips, press the cloth down evenly and check that the grain remains straight. A slack frame is responsible for many disappointing starts, so pause and test it again after a few minutes.
Step 2: thread the tool and establish a rhythm
Yarn choice controls both texture and ease. Choose punch needle yarn that slides smoothly through the hollow shaft without fluffing excessively. Test a second color of punch needle yarn on the swatch, then reserve a third punch needle yarn for accents only if its thickness matches. A medium-weight yarn is friendly for a first piece; very thin yarn creates delicate detail but demands closer spacing, while bulky yarn may jam. Read the tool's size recommendation rather than forcing a thick strand through a small opening.
Threading a punch needle is easier when the yarn end is cut cleanly. Practice threading a punch needle once before loading the frame, and repeat threading a punch needle whenever the strand snags rather than tugging. Feed the included threader through the needle from the point until its loop exits at the handle. Place the yarn into that loop and pull it through, then feed the yarn through the eye at the point. Leave a generous tail behind the cloth. The strand must move freely; if it catches on a sharp cut end, smooth or replace the yarn before starting.
The basic answer to how to use a punch needle is to keep the tool upright, plunge it all the way until the handle meets the cloth, then lift only as high as needed to glide to the next point. When learning how to use a punch needle, watch the bevel instead of twisting your wrist. A final reminder about how to use a punch needle is to let the yarn feed freely. The opening or bevel faces the direction you are traveling. Make a short line of practice loops outside the design, turning corners slowly. On the front, you should see loops of similar height. On the back, the yarn should lie in relaxed, tidy floats rather than tight lines.
Step 3: fill the shape and inspect often
Outline one color area, then fill it with rows that sit close together. These are simple punch needle stitches, but their consistency comes from the distance between punctures. Count a few punch needle stitches at each checkpoint so you can compare density, then vary a third group of punch needle stitches only for a deliberate texture. Move about one yarn width at a time, and avoid dragging the point sideways while it is still in the fabric. At a curve, shorten your steps instead of twisting the needle sharply. It is fine to lift out a few loops and repeat a section while the cloth is accessible.
Treat your punch needle pattern as a map, not a prison. I usually begin at the outer edge, then spiral inward so the outline stays clear. Sketch a second punch needle pattern on scrap cloth before changing the composition, and save a third punch needle pattern for a later color study. Leave no large gaps, but do not crowd so tightly that the cloth puckers. Every dozen punctures, turn the frame and inspect the raised side. This checkpoint catches a skipped area before it is hidden by another color.
Good punch needle tension changes during a long session. Check punch needle tension at the beginning, middle, and end of a row, and record a third punch needle tension check after moving the frame. If the fabric begins to sag, loosen the ring just enough to pull it tight again, then retighten evenly. If loops suddenly become short, check that the tool is entering to the same depth and that the yarn is not snagged under the frame. If loops are falling out, the most likely issue is a loose foundation or a needle lifted too high between punctures. Gently pull the surrounding cloth flat, reset the area, and continue slowly.
For lettering or small accents, make shorter passes and use a finer yarn only if the cloth supports it. Change colors on the reverse by leaving tails long enough to secure later; do not knot bulky lumps beneath a delicate area. Your hands should remain relaxed. I keep the yarn bowl on the floor or beside my non-dominant hand so the strand feeds without pulling the frame.
Step 4: secure the surface and finish the art
When every region is filled, turn the work over and inspect the back. Loose tails can be woven under nearby stitches or anchored with a small dab of suitable fabric glue. Let adhesive dry fully before trimming. A successful piece should survive a very gentle shake without losing loops. Do not trim anything until you have photographed the uncut texture; a high loop may be exactly what gives a cloud or flower its character.
If a level surface is your goal, trim punch needle loops in several light passes. Hold small scissors parallel to the fabric and snip only the highest fibers, rotating the work as you go. To trim punch needle loops evenly, pause after the first pass; then trim punch needle loops a second time only where shadows remain. Keep your free hand behind the cutting path and use short, controlled motions. Never dig down toward the foundation, since one accidental cut can release a row. You can leave the loops plush, carve selected shapes, or combine both finishes for contrast.
The best punch needle troubleshooting habit is to diagnose before pulling everything out. For punch needle troubleshooting, first inspect the reverse, and return to punch needle troubleshooting at the end of each color block. A bare patch needs closer stitches. A wandering outline may need shorter steps around the curve. A fuzzy surface may need a different yarn or a fresh pair of scissors. If an entire area slips, take out only the damaged section, re-stretch the frame, and repunch with a slightly denser rhythm. Most repairs disappear into the texture.
To mount punch needle wall art, press the finished piece face down on a clean towel, place a backing behind it, and fold or glue the edges neatly. A simple wooden frame, magnetic hanger, or canvas-wrapped board all work. Measure the backing before mounting punch needle wall art, and photograph the finished punch needle wall art before hanging it. Keep the textile away from prolonged moisture and strong direct sun, and dust it with a soft brush rather than washing it. If you want the piece to feel contemporary, use a restrained palette, a generous margin, and one unexpected bright accent.
That balance is what draws me to modern fiber art: the design can be minimal while the surface remains full of human marks. A second modern fiber art piece can echo the first with a different scale, while a third modern fiber art study can focus on texture alone. Make notes about the yarn, needle height, and frame tension after finishing. Your next project will benefit from those observations, and the confidence gained from one small hanging will make a larger scene feel entirely manageable. This is also why punch needle for beginners works best when the first design stays small.
Materials You'll Need
- Punch needle tool
- Monk's cloth or suitable foundation fabric
- Worsted or punch needle yarn
- Embroidery hoop or gripper frame
- Pencil or washable fabric marker
- Small sharp scissors
- Backing fabric and fabric glue
Step-by-Step
Choose and Stretch the Materials
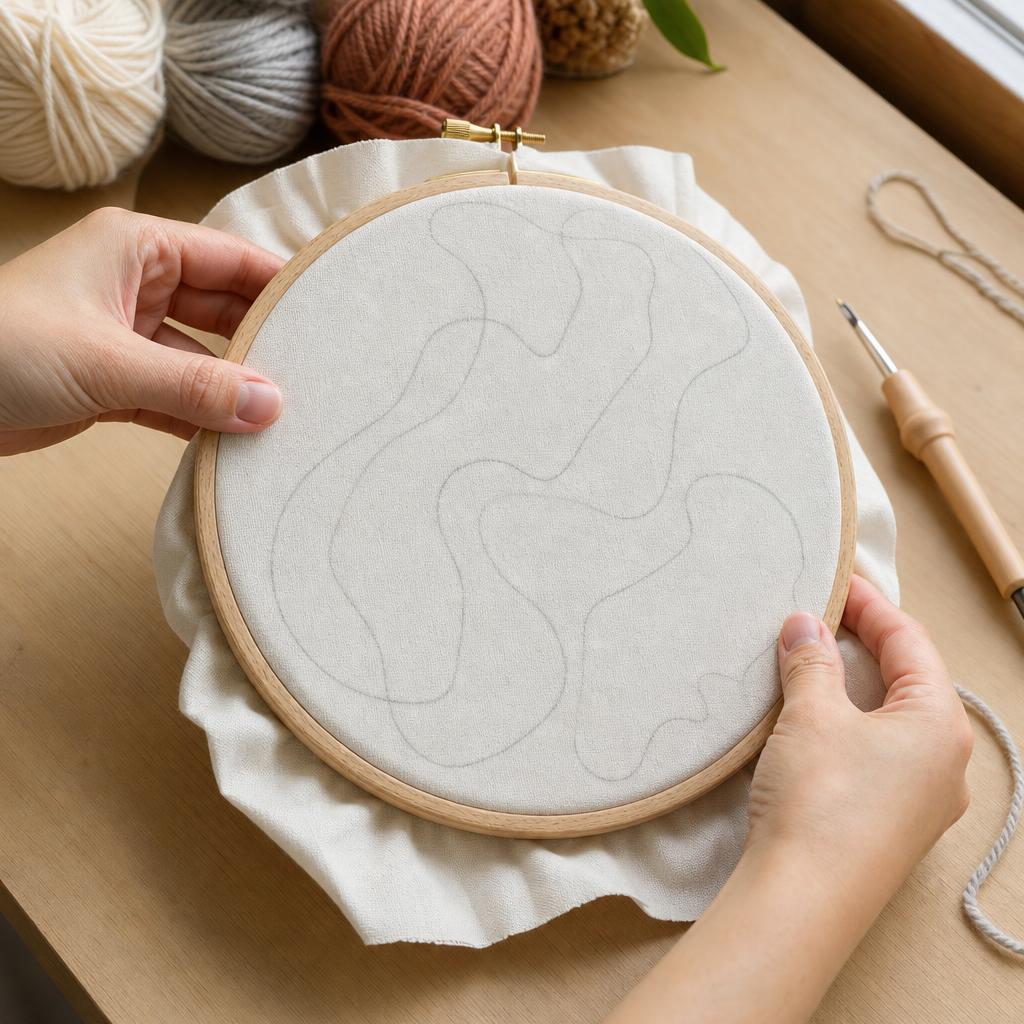
Choose a simple motif with broad areas, such as a sun, arch, leaf, or checkerboard, rather than tiny lettering or sharp portrait details. Gather a punch needle tool, firm monk's cloth or another compatible foundation, yarn in the tool's recommended weight, a hoop or gripper frame, a washable marker, and scissors. Test a corner of the fabric with three punches before drawing the final design: the weave should close around each puncture without fraying or leaving a permanent hole. If the cloth feels loose, brittle, or fuzzy at the test, replace it rather than trying to rescue it with glue. Trace the motif on the reverse side, add a small arrow for each color's travel direction, and leave a generous border for mounting. Place the fabric over the inner ring, fit the outer ring, and pull opposite edges gradually like lacing a shoe. Tighten evenly until the surface sounds faintly drumlike when tapped and the weave remains straight. A slack corner is a warning checkpoint; release the ring, redistribute the tension, and retighten instead of stretching one edge until it distorts. Choose yarn that slides freely through the hollow shaft, and make a practice row at the selected needle height. The front should show even loops, while the reverse should have relaxed floats. Keep the frame stable on a non-slip surface, and protect the work area from marker stains and sharp scissors.
Thread and Begin the Motif
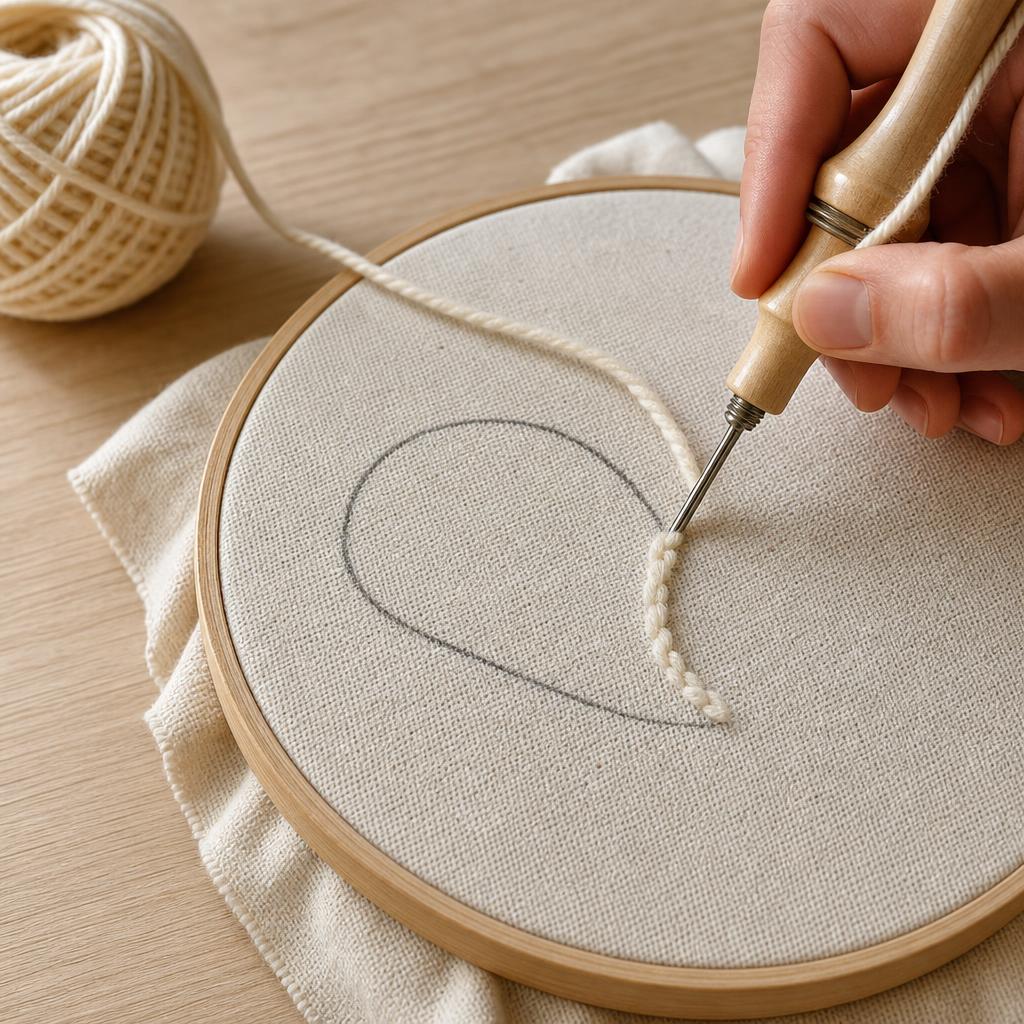
Cut the yarn end cleanly so it will pass through the threader without catching. Feed the included threader through the punch needle from the point until its loop emerges at the handle, insert the yarn into that loop, and pull it back through the shaft. Then pass the yarn through the eye or slot at the needle point, leaving a generous tail on the back of the cloth. Pull a short length from the yarn bowl so it feeds freely; a snag behind the frame will shorten loops and can pull the foundation loose. Hold the tool upright, with the bevel or opening facing the direction you intend to travel. Start just inside the motif outline, push the point completely through until the handle meets the fabric, and lift only high enough to glide one yarn-width to the next position. Repeat this plunge-and-lift rhythm without twisting your wrist. Make a short practice line in a spare corner, then inspect both faces. The front should show loops of similar height; the reverse should show soft, even floats rather than tight diagonal lines. If the outline wanders, stop after two or three stitches, lift those loops gently, and restart with shorter steps around the curve. If the yarn snags, never yank it: pull the tool out, clear the obstruction, rethread if necessary, and return to the last secure stitch. Keep fingers behind the needle path and use a stable frame to avoid accidental punctures.
Build Even Loops and Check Tension
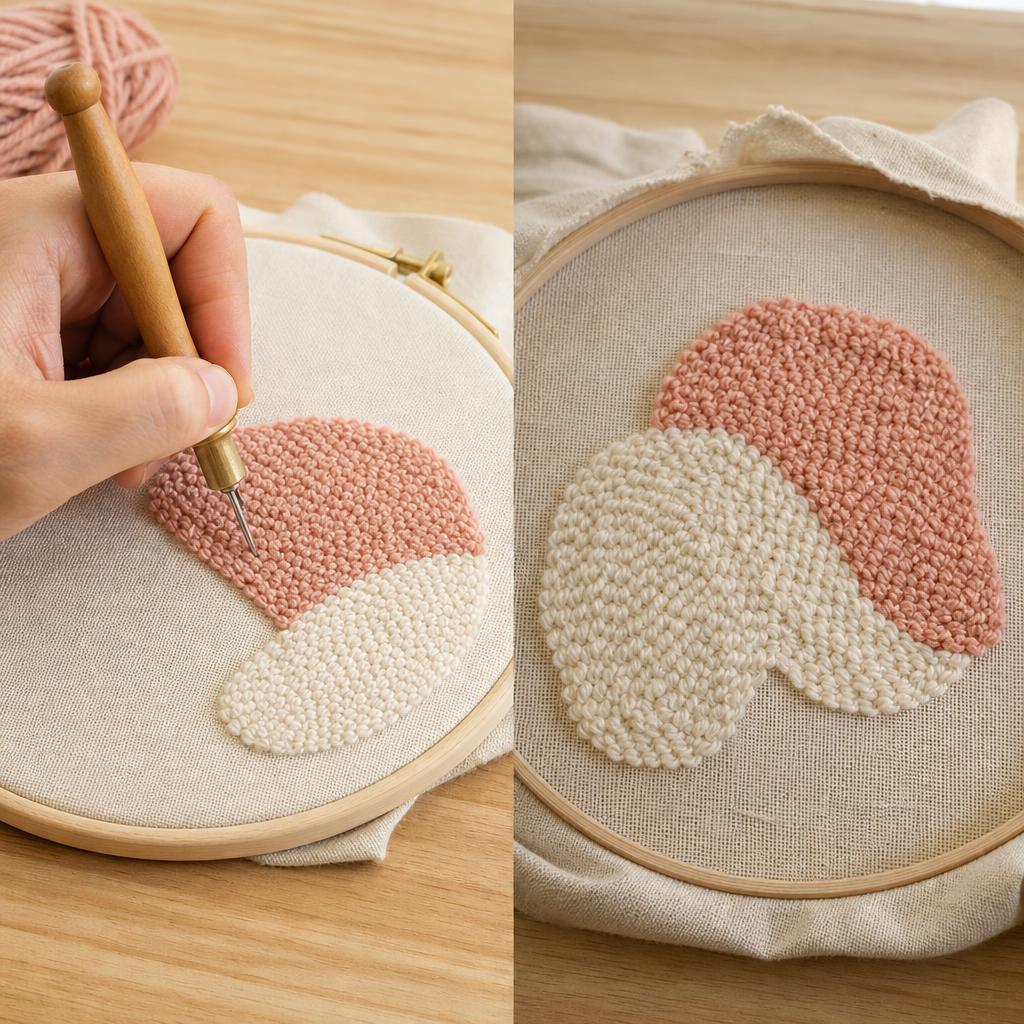
Outline one color area first, then fill it with close rows that overlap visually without crowding the weave. Keep the punch needle upright and move approximately one yarn width between punctures; push to the same depth every time so loop height stays consistent. At curves and narrow corners, shorten the steps and pivot the frame rather than twisting the needle sharply. Every dozen punches, pause, turn the frame, and inspect the raised front for bare cloth, uneven height, or an outline that is drifting. Check the reverse as well: the yarn should lie in relaxed floats, not tight bars that pull neighboring loops. If a patch is sparse, lift only the affected stitches with the needle point and repunch the gap at a slightly denser rhythm. If loops suddenly become short, look for yarn caught beneath the frame and confirm that the tool is reaching its full depth. If loops fall out, the foundation is probably slack or the tool is being lifted too high; re-stretch the fabric evenly, reset that section, and continue slowly. Do not compensate for a loose frame by adding extra glue. Before changing colors, finish the boundary, leave a tail long enough to secure on the back, and note where the next color begins. Keep yarn relaxed in a bowl beside your non-dominant hand, and take breaks before hand tension makes your grip rigid. A calm, repeatable rhythm is more important than speed.
Secure, Trim, and Finish
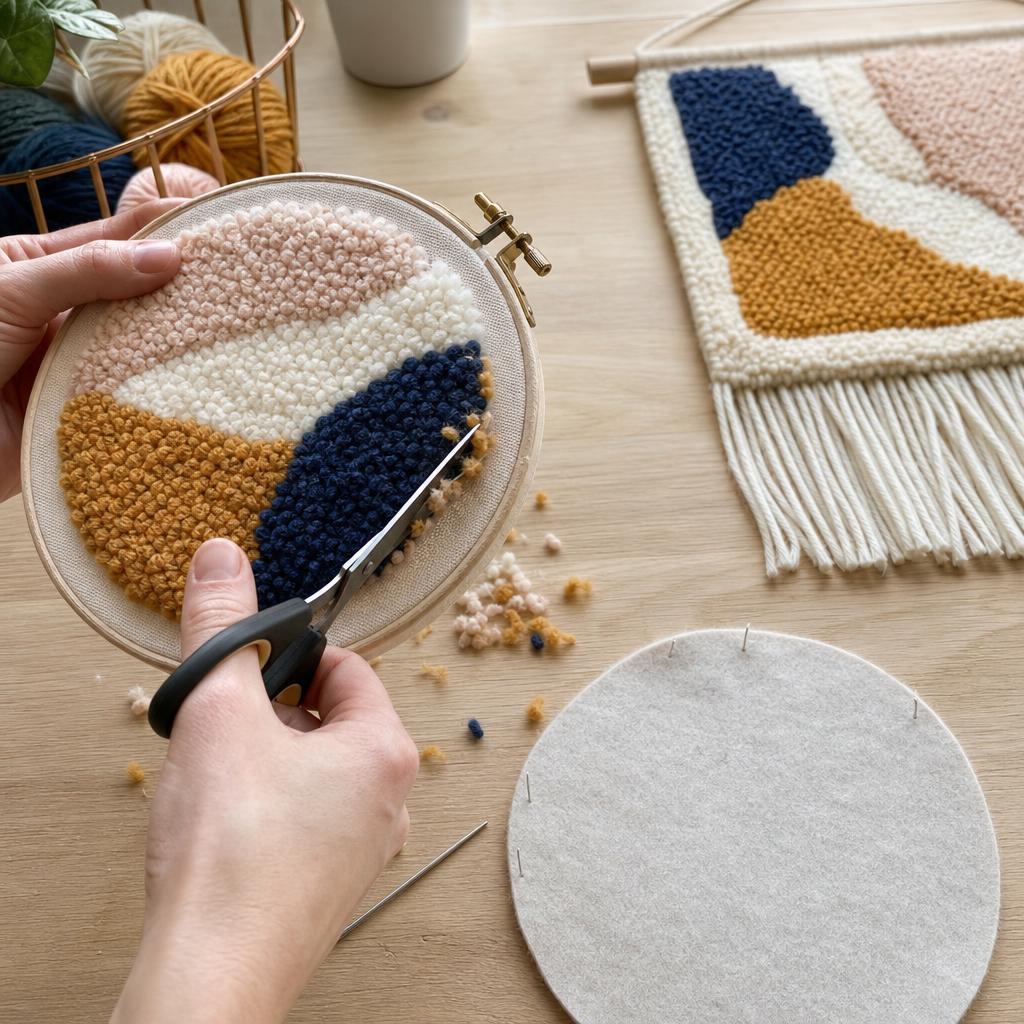
When all color areas are filled, turn the piece over on a towel and inspect the reverse. Weave loose yarn tails beneath nearby floats or anchor them with a small dab of suitable fabric glue, keeping adhesive away from the visible loops. Let the glue dry completely, then give the work a gentle shake; no loops should release. Photograph the untrimmed texture before cutting, because a high loop may be an intentional highlight. If you want a level surface, trim punch needle loops in several light passes with small sharp scissors held parallel to the fabric. Rotate the piece, snip only the highest fibers, and keep your free hand behind the cutting path. Stop after the first pass to check the silhouette; a second pass should address isolated shadows, not remove pile down to the foundation. If you accidentally cut the cloth or release a row, stop pulling, place a backing patch behind the damage, and secure the nearby yarn before repunching that small section. For mounting, press the textile face down on a clean towel, fold the excess foundation neatly to the back, and glue or stitch a backing fabric in place. Attach it to a wooden frame, canvas-wrapped board, or magnetic hanger only after the backing is dry. Keep the finished wall hanging away from prolonged moisture and strong direct sun, dust it with a soft brush, and never machine-wash it. Store scissors closed or pointed away when not in use, especially while trimming near your supporting hand.
Written by

Emma Clarke
Mixed Media & Resin Art Specialist
Emma merges science and art in her mixed media practice. She specializes in resin pouring, alcohol inks, and unconventional material combinations.